When manufacturing engineers discuss material surfaces, they usually focus on their physical attributes, such as surface topography or morphology or, more simply, surface roughness.
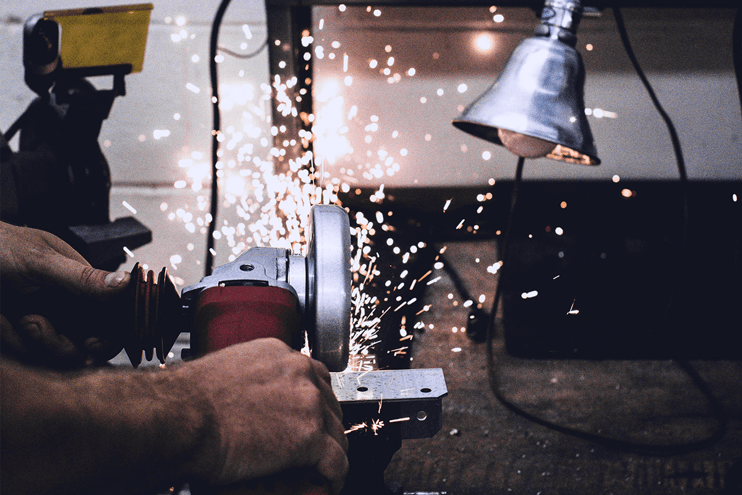
Preparing material surfaces for assembly, coating, painting, or adhesive bonding typically includes steps that undoubtedly alter the landscape of that surface. The instructions included with most adhesives frequently state, “...roughen the surface thoroughly before applying the adhesive”. Abrading, media blasting, chemical etching, laser etching, and other manual forms of surface manipulation are used to prepare or clean a surface to change the material's roughness. You can often see or feel the difference made.
The inquiry arises as to whether the surface's roughness is the most crucial factor in creating a reliable adhesion. How significant is it, really? Suppose a rough surface is the sole determinant of surface characteristics. How do we explain that we can attain excellent adhesive bonds with smooth surfaces like polished metal, glass, or an atomically smooth silicon wafer?
The Going Theory of Surfaces
The idea behind roughing up a surface to promote adhesion comes back to the idea of creating a “more” surface or expanding the “surface profile” upon which to adhere. If sanding a surface makes grooves and flattens out peaks in the tiny topography of the surface, then the going theory says that there are more places for the adhesive to hold on to, which averages out to better adhesion overall.
The fatal flaw in this assumption is that adhesion failures and issues still exist in processes that only rough surfaces up in order to create better adhesion. What’s more, is that good adhesion can be indirectly attributed to surface roughness when this isn’t necessarily the case. When most surfaces are abraded, they are also typically cleaned in some other way as well.
- Some metals are dipped in a phosphoric acid solution
- Stainless steel is often cleaned with a hydrochloric acid/hydrogen peroxide/formalin/water combination
- Plastics and other formed or cast materials need to be completely cleaned of mold release and other oils before abrasion so those contaminants aren’t being ground into the surface of the material
- Finally, even if the abrasion is the only surface treatment process used, it frequently will remove at least some of any contamination
This isn’t exactly news to manufacturers. Here’s a common scenario in a production facility: Let’s say we abrade a part, rinse it with the proper solution, and let it sit for six months in storage. It’s well understood that this part will not be able to be bonded to or coated in the same way that a freshly prepared part would. But the roughness of the surface would be unchanged. So, what makes the difference?
Rethink your adhesion manufacturing processes with Surface Intelligence.
Surface Chemistry is the Difference
The property of the surface that changes while in storage is its chemical characteristic. Aging is a major factor to consider throughout the adhesion process because the effects of time on a surface can be monumental. Here’s an article we recently wrote on that exact subject. The effect of aging on a surface is more than just collecting dust that needs to be blown off.
Over time, surfaces can degrade just by being exposed to a production environment or even the materials the parts are stored in while on the shelf.
Every surface preparation method changes the chemical nature of the material surface. Even if the intended impact is to merely rough up the surface, chemical bonds are broken, and chemicals are added to that surface that is coming into contact with the adhesive or coating. The chemistry of every surface needs to be understood and controlled in order to have maximum effectiveness in creating bondable surfaces.
To better understand what abrasion and other surface preparation methods are doing, look at the diagram below:
When you abrade a surface, you cleave through the bulk material and fracture molecular bonds. Within milliseconds, oxygen starts attaching itself to these reactive sites created by fracturing the bonds on the first few molecular layers. You also get water vapor in the form of hydroxyl groups that attach themselves to these reactive sites. And with each molecular group that attaches itself, you lose a reactive site, and you lose some of that chemical potential. This evolution of the surface from a clean, high-energy surface to a contaminated, low-energy surface continues as long as the surface remains exposed. A kind of contaminant soup forms on the top (see diagram above). This could be hydrocarbons, handling oils, silicones from a nearby molding operation, or anything else that's in the environment where the abrading is happening or the part is being stored.
When we talk about adhesion, we really care about the top one to five molecular layers of the surface of the material we’re preparing. You need a really good picture of the chemical nature of the surface you're creating throughout the entire adhesion process. And you need to be sure you are maintaining that surface day after day, shift after shift.
Know How You’re Changing Your Surfaces
As we stated above, whenever you abrade a material, you are changing the surface's chemistry, not just the texture. And often, it is very difficult to know exactly how you are actually changing that chemistry.
For instance, depending on the type of sandpaper being used when a surface is sanded, stearates can be left behind. Stearates are coated on many sandpapers to keep abrasion debris from loading up the sandpaper itself. This extends the life of the paper, but be careful because this stearate can transfer to the surface you are sanding and impact adhesion.
How Do You Know Your Rough Surface is Clean?
Water contact angle measurements are the best practical method for quantifying surface cleanliness. There are many reasons why this is so, which you can read about here. Suffice it to say that this measurement is the most sensitive to contaminants that are detrimental to adhesion, provides a truly objective measure of surface quality, and can be used directly on the production line on real parts.
A frequent question from people who use contact angle measurements to characterize surfaces and control manufacturing processes is, “What effect does surface roughness have on these measurements?” Without sounding too glib, the answer is “it depends.” It depends on the shape of the roughness, and it depends on the way in which the liquid drop is deposited on the surface, and it can depend on the contact angle range being measured. However, in most situations where you’re using contact angle measurements to control surface cleaning and treatment processes (particularly if you’re using contact angle measurements to compare the cleanliness of surfaces of relatively similar roughness), roughness effects can, ostensibly, be ignored.
There are many kinds of roughness, and many parameters are used to quantify roughness. However, the extremely abrupt features that affect contact angle measurements are not typically encountered in surfaces prepared for bonding. In most cases, roughness won’t have a significant influence on contact angles. In general, if two surfaces have similar roughness profiles, and those profiles are not extremely sharp, the chemical differences in those surfaces will affect the contact angle much more than differences in roughness.
The effects of roughness on contact angle measurements depend greatly on how the liquid drop is deposited on the surface. Pinning around the perimeter of the drop due to the edges of the drop getting stopped from fully wetting out by asperities in the rough surface means that an accurate contact angle is harder to measure on a surface with certain textures.
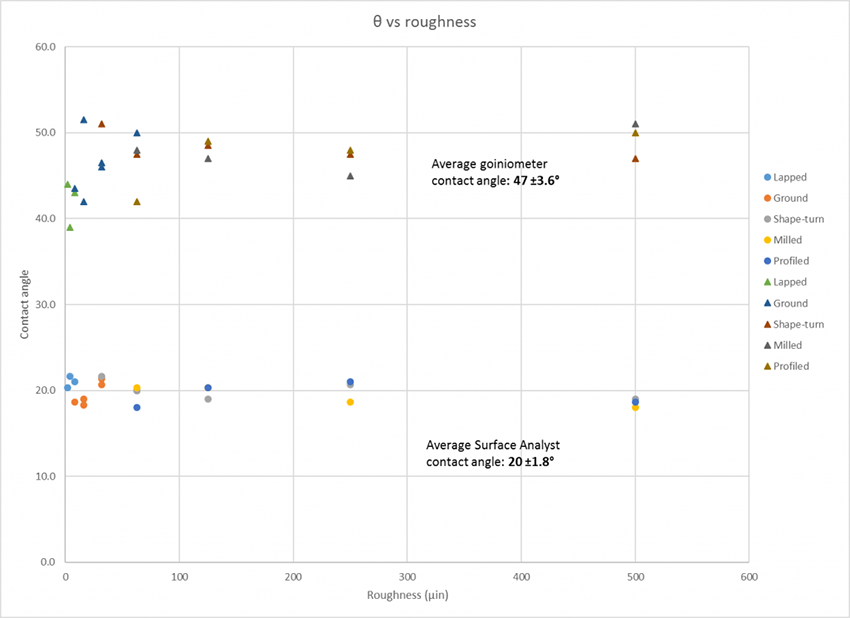
This is especially a problem with traditional contact angle measuring instruments that utilize a syringe, a pump, or a ‘liquid needle’ to deposit the liquid. A significant advantage of the Surface Analyst is how it creates the surface drop from a pulsed stream of nanodroplets. In this technique, called Ballistic Drop Deposition™, the impact of the nanodroplets impart large amounts of kinetic energy into the liquid drop during the deposition process. These impacts advance the drop perimeter over any surface asperities. The drop then recedes slightly in the inter-impact period due to liquid surface tension. This repeated advancing and receding of the drop perimeter during growth greatly reduces the tendency for the drop perimeter to be pinned by surface roughness. This creates particularly round drops whose contact angles can be measured as though the surface were smooth. Because of this, the Surface Analyst is much less sensitive to surface roughness and can still collect accurate, reliable contact angle measurements on any surface.
In this chart below, you can see how the Surface Analyst is able to take reliable measurements on a variety of textured surfaces compared to a traditional benchtop goniometer. The contact angles gathered by the goniometer are much higher than the ones collected by the Surface Analyst due to the effects of pinning.
What You Need to Remember About Surface Roughness
At the end of the day, surface roughness is irrelevant if the surface's chemical composition is not compatible with the adhesive. A surface must be chemically clean for adhesion to be successful, no matter how well or carefully roughed up it is.
- You can make an excellent joint with a glass-smooth substrate if it is clean.
- A well-roughened surface will make a poor joint if it is not clean.
These two points are crucial to remember when optimizing your adhesion process and deciding on surface preparation steps. You can abrade a surface nicely, then spray a tiny amount of mold release on it, and the ability for that surface to adhere is completely gone. It still has the same roughness it had before the mold release was applied, but it will now make a terrible adhesive joint.
To learn more about adhesion and how you can optimize your processes to leverage successful bonding, download the eBook "What is Adhesion?"

