In manufacturing, a final assembly is only as reliable as its constituent parts, the bonding or joining method used to hold them together, or the coating method used for corrosion protection and/or the final aesthetic touch. In order to guarantee the strength and successful performance of a product, manufacturers need to institute process control measures as far upstream as possible.
Supplier quality control is vital to the overall health of the manufacturing process. A crucial aspect of this control protocol is measuring the quality of parts and components coming in from various vendors.
Procuring raw materials in manufacturing is a nuanced process. Procurement professionals need to balance mandates for cost containment with a holistic understanding of the total cost of raw materials. Choosing a raw material vendor based merely on low cost can be the wrong decision. Raw materials of low quality can drive up production costs when those less expensive raw materials cause product failures in the field and increase internal scrap rates.
Procuring parts for surface adhesion is equally nuanced. Purchasing a metal component that will be bonded to other parts requires clean surfaces for effective surface adhesion. Purchasing agents need to consider the cost of the incoming raw material and how much “in-house” work will be required to prepare the surface for reliable bonding. A careful analysis of costs may reveal that, in the long run, it costs less to purchase a more expensive part that meets organizational standards of “clean” than it does to purchase a less expensive part that requires significant organizational resources to meet the same organizational standards of “clean.”
Rethink your adhesion manufacturing processes with Surface Intelligence.
A few questions arise in this scenario:
- How can a manufacturer accurately gauge the cleanliness of each incoming part to determine which is higher quality?
- How can manufacturers standardize surface cleaning processes to comply with a uniform definition of “clean”?
- How can team members measure surface cleanliness to ensure the efficacy of their cleaning process?
Measuring Cleanliness to Understand Part Quality
A manufacturer recently partnered with Brighton Science surface science and process experts to examine their adhesion process. This manufacturer wanted to improve its process for attaching a conductive wire to a metal component.
The manufacturer sourced its metal components from three different vendors. However, there were no objective, quantitative standards in place that defined acceptable surface cleanliness parameters of incoming material from suppliers. Without standards, the manufacturer accepted materials with inconsistent surface cleanliness levels and varying sources of contamination between vendors.
Brighton Science took a scientific approach to develop quantitative cleanliness standards for metal components. Water contact angle measurements (WCAs) were used to develop quantitative standards for these incoming raw materials. Using WCAs, the manufacturer was able to grade the quality of material provided by their vendors based on the level of cleanliness.
By knowing the baseline grade of material quality coming into their process, the manufacturer hoped to implement a plan to mitigate surface cleanliness inconsistencies found on incoming raw materials and optimize their ultrasonic cleaning process.
Designing a Test Methodology
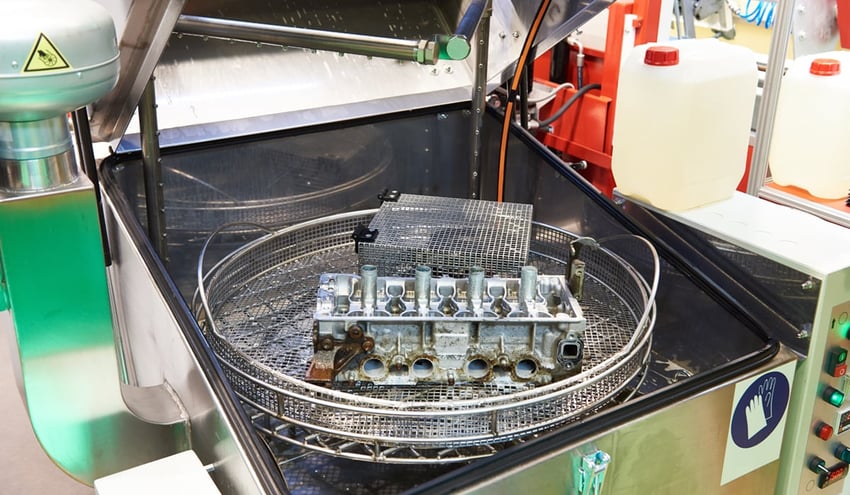
The manufacturer had six detergents and three concentrations for each detergent to evaluate in an ultrasonic cleaning process. Eighteen tests were required to determine which detergent at which concentration level would be the most effective for cleaning the dirty metal components.
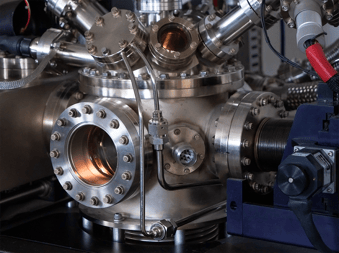
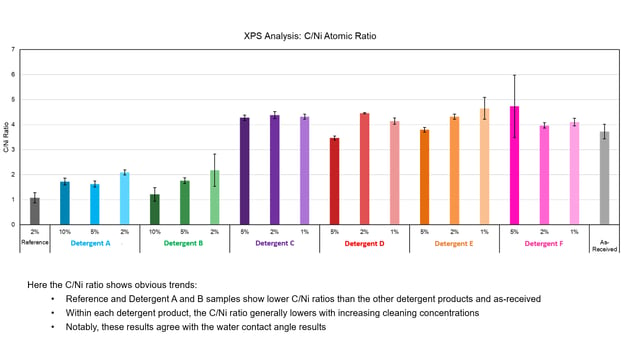
To evaluate the cleanliness of the parts going through the cleaning process, scientists from Brighton Science used a technique called x-ray photoelectron spectroscopy (XPS) to visualize the atomic composition of the surface of each part. Through XPS, we learned that the carbon-containing substances on the surface of the metal components were preventing strong and reliable adhesion. These substances are the contaminants that must be removed to permit reliable wire bonding. Looking at the ratio of carbon (from the contaminants) to nickel (from the substrate) lets us assign a number to the cleanliness of each part.
The chart below shows how this carbon-to-nickel ratio changes with the cleaning process. There is a clear difference in the detergents’ ability to properly clean the metal's surface.
Measuring Cleanliness in Real Manufacturing Processes
XPS is widely accepted as a reliable measurement method for determining the chemical composition of a surface. It is, however, a very expensive and labor-intensive lab technique that can only be done on small samples. Although XPS provided the results we were seeking — an analysis of which detergents in which concentration levels were the most effective at cleaning the parts — XPS is not a practical or portable test that can be used on a factory floor during the manufacturing process for material acceptance, quality assurance, or process control.
WCA and XPS Provide Comparable Results
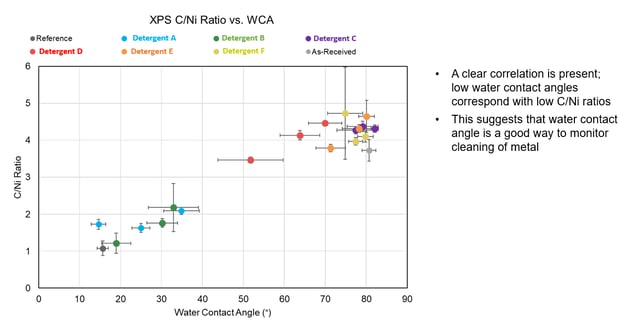
Contact angle measurements are a surface analysis technique that is as sensitive to changes in surface composition as XPS. This is shown in the graph below. Low contact angles clearly correspond to low carbon-to-nickel ratios discovered by the XPS evaluations. This allows us to rely on WCA as a convenient cleanliness probe to determine the surface quality of the metal components that are as sensitive as XPS.
WCA is the Preferred Solution for Surface Quality Checks on the Manufacturing Floor
Contact angle measurements are equally sensitive to the chemical cleanliness of the surface as XPS, but the method of collecting WCA data is extremely rapid, flexible, and inexpensive, and any user can conduct the tests directly on real parts during the production process.
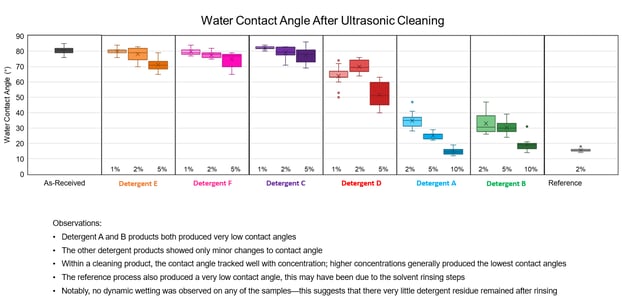
The chart below shows how using contact angles to measure the same samples provides manufacturers with exactly the information they need to measure cleanliness. Remember, high contact angles correspond to contaminated surfaces, while low contact angles correspond to surfaces that are clean on a molecular level. This data (which can be generated in hours instead of days) immediately reveals the superior detergents and the best concentrations. Furthermore, this data can be used as a reference during production to make sure that the cleaning process continues to work as expected.
Using Contact Angles to Create a Cleaning Methodology
Quick and accurate surface cleanliness measurements enable manufacturers to develop a cleaning methodology based on real and meaningful data. Contact angle measurements offer instant, quantitative feedback, both before and after cleaning procedures, so manufacturers can precisely gauge the effectiveness of their cleaning processes. Without quantitative surface cleanliness standards and the testing methodologies to measure part compliance to those standards, manufacturers must rely on either subjective visual observations or the unsubstantiated claims of detergent suppliers.
When manufacturers can make data-based decisions, they can ensure their parts will work as designed and their adhesion will perform as intended.
Manufacturers of cleaning chemicals and processes recommend changing fluids based on maintenance intervals, not cleanliness performance. A more accurate approach is to monitor the cleanliness of surfaces as an indicator of when the cleaning materials should be changed. Having a direct measurement of surface cleanliness based on contact angle enables manufacturers to change the cleaning materials based on actual cleaning results, offering manufacturers a more deterministic control of their cleaning and adhesion process.
Get hands-on with your surface cleanliness with the Surface Analyst 5001.
Alternatives to Water Contact Angle and X-Ray Photoelectron Spectroscopy
There are several legacy methods of inspecting surfaces and evaluating cleanliness, but none are as holistically useful as WCA measurements for process control in manufacturing. Many of these methods are subjective, difficult to implement, destructive, or all of the above.
-
The water break test is related to contact angle in that it utilizes water to determine the presence of contaminants, but it is a qualitative evaluation that relies fully on a visual assessment of the behavior of water on a surface. It does not allow for precise differentiation of similar processes, so it would be of no value in this case study looking at different detergents.
-
Dyne ink and pens offer another highly subjective test. Test results vary greatly based on the user’s interpretation of the behavior of the ink. Neither the water break test nor the dyne test are universally applicable on all surfaces. Some contaminants will not show differences in dyne level — so false positives that incorrectly indicate clean surfaces are common. Dyne tests are messy. They require ink, which must be removed from the surface after the test. Dyne tests provide a good example of a testing methodology that can introduce contamination as part of the testing process. Testing methods that introduce contamination to surfaces should be avoided.
-
There are tests that simply use a 'test' adhesive joint to evaluate a cleaning or surface treatment process. This time-consuming test does not lend itself to quality control, process control, or material acceptance.
-
Infrared spectroscopy (FTIR) is a fairly common laboratory surface evaluation technique. It requires specialized equipment and expertise to analyze the results, and it is difficult to use on typically manufactured parts with large or complex geometries.
Contact Angle Offers Predictive Cleaning Process Analytics
Contact angle is a widely applicable process control technique that generates actionable data at any point in the adhesion process where surfaces have the opportunity to change, intentionally or unintentionally. All of these areas are called Critical Control Points (CCPs), and it is imperative that manufacturers have a way of knowing how these changes will affect the reliability and performance of their final products.
Contact angles provide a quantitative measurement for determining the surface quality of incoming materials, allow for differentiation of suppliers, and can be used to define specifications given to the suppliers.
If surfaces are cleaned, the cleaning process needs to be developed using structured methods incorporating quantitative data and feedback to determine the most effective cleaning method and products. XPS is a surface-sensitive technique that provides this feedback very well, but contact angle is much easier to use within the context of a production process and correlates extremely well with XPS data. Manufacturers can use contact angle measurements alone to test surface cleanliness when testing cleaning products and determine when the cleaning materials or methods need to be changed.
To learn more about using contact angle measurements as an easy quantitative technique for incoming material inspections and designing and monitoring your cleaning process, download our free eBook, "Metrics that Matter: Quantifying Cleaning Efficacy for Manufacturing Performance."

