Process gaps emerge in production processes any time manufacturers lack all the information they need to make decisions that will prevent or solve adhesion problems. Often, these gaps result from oversights; however, they can also exist and be difficult to detect because they only become obvious when manufacturers fundamentally rethink cleaning or adhesion processes.
Every production process that involves some kind of bonding, coating, printing, sealing, laminating, painting, or cleaning has an adhesion process woven throughout. When asked to define their adhesion processes, many discuss the final steps: cleaning or treating the material surface and then the final bond/adhesive step (painting, coating, sealing, etc.). However, the adhesion process encompasses much more than that. The adhesion process should be looked at holistically--everything that happens to the material surface directly impacts the reliability of assembled material systems.
Part of rethinking your adhesion process is to identify each Critical Control Point. A Critical Control Point is an area where the material surface has the opportunity to change either intentionally or unintentionally. The changes at each Critical Control Point can have either a positive or negative effect on the application. When these changes are controlled and monitored, it becomes clear there are many more aspects to the adhesion process than most manufacturers know.
Optimize the power of next-gen connectivity with data & surface intelligence.
To permanently close process gaps, manufacturers need to understand them as Critical Control Points that can be managed and that do have an impact on adhesion.
Here are four common process gaps that, when not properly controlled, can sink an entire production operation.
1. What are you doing to the surface?
To fully understand and control adhesion processes, it is necessary to scrutinize the preparation, cleaning, and treatment steps involved. The preparation steps will vary depending on the material used in production (metals, polymers, composites, etc.) and the application (printing on rolls of film, adhesive bonding of molded composites, wire bonding on electronic components, coating polymer tubing, etc.). What they all have in common, however, is that they are creating what Surface Scientists call “a new surface.” Adhesion is a chemical interaction between a surface and an adhesive or coating and only involves the top few molecular layers of the material’s surface. All treatment and preparation steps work to make that surface chemically responsive to the adhesive or coating.
Appreciating the fact that adhesion processes are chemical processes allows for precise control of the surface quality as it relates to what is occurring at the top few molecular layers. That’s a fundamental shift from how most manufacturers view their processes.
That is why the Critical Control Points at each cleaning or treatment operation need to be controlled through quantitative verification methods. Inspecting the changes to the chemical state of the surface proves how effective each surface manipulation step is at producing a better surface.
2. What is the state of your surface before and after surface manipulation?
Similar to what was stated above, to answer this question with certainty, a quantitative evaluation of surface quality must be obtained before and after every point at which the surface is being altered or at each Critical Control Point. Several tests (dyne ink tests, water break testing, ion chromatography, etc.) indicate what's happening on a surface. However, they do not give precise measurements directly correlated to the likelihood of successful adhesion. Additionally, they can be onerous, destructive, and subjective.
Adding a number (such as a contact angle measurement) to the surface quality gives exact, actionable data on how much the surface changes and whether it is enough compared to the surface quality specification. With this information, manufacturers can make educated decisions on optimizing their machines and preparation procedures. Validating these steps with a reliable measurement removes the guesswork and gaps that lead to the inability to solve adhesion problems.
Without a quantitative inspection of the surface before and after every preparation and treatment step, each of these Critical Control Points becomes a process gap that isn’t controlled. It is important to begin thinking of all steps of the adhesion process as Critical Control Points in addition to the areas not traditionally associated directly with the adhesion process. The old adage “You can’t manage what you don’t measure” comes into play here. Applying measurable, numerical values to surface quality changes at each Critical Control Point makes process management possible.
3. How long since the surface has been intentionally altered?
Changes to material surfaces occur throughout the entire manufacturing process. What most manufacturers may not be aware of is that the surface is also changing between the surface manipulation operations, as well as in storage and handling.
Time is of the essence. Processing steps—such as plasma treatment, hand abrading, ultrasonic parts washing, chemical etching, solvent wiping, and many more—all serve to create a surface ready for adhesion. The time between these steps can have just as big an impact as the steps themselves.
For instance, surfaces treated using an activation technique, such as corona or plasma, become highly reactive to ambient contamination and other environmental factors, leading to rapid surface degradation.
Below is a chart showing contact angle measurements (a quantitative surface quality test that correlates to how prepared a surface is for adhesion) taken on polymeric surfaces that were plasma-treated and then put into storage for up to 48 hours before the adhesion step. As you can see, the PTFE did not retain its surface energy post-treatment, yet the HDPE held its newly created surface quality with greater stability.
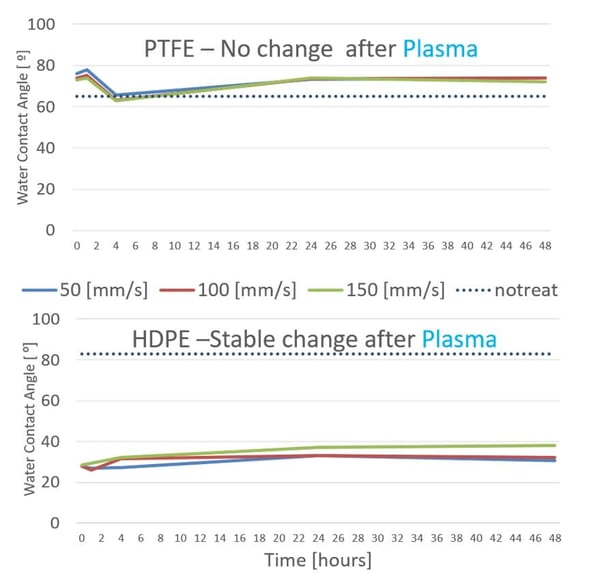
This shows how important it is to know the characteristics of your chosen material and how it responds to treatment or cleaning. Due to its chemical makeup, each material will have different rates of degradation and require individualized optimization of the preparation operations and equipment.
4. If you’re experiencing adhesion failure, what does it look like?
Before finding the root cause of an existing adhesion problem, manufacturers need to identify the kind of failure they are seeing. The application of an adhesive or coating and the curing or finishing process are also Critical Control Points. When failure is experienced at this point in the adhesion process, you can learn a lot about where to look to find the root cause of the deficiency if you can identify precisely where the breakdown occurs.
All adhesion failures can be classified into one of three buckets: adhesive failure, substrate failure, or cohesive failure. Determining which kind of failure your material system is experiencing is the first step in remediating the issue.
Adhesive Failure - a failure that occurs at the interface of the adhesive or coating and the material being adhered to

Substrate failure - a failure with the bulk material of the metal, polymer, etc., being bonded or coated.

Cohesive failure - a failure within the bulk material of the adhesive or coating itself.

If you analyze the nature of the failure and determine it to be cohesive or substrate, then the course of action is clear. You need to look at the mechanics of the bonding, coating, or printing operation because there is something inherently flawed in the constituent parts. There could also be an issue with the curing steps not fully finishing the job. For instance, the adhesive may not be strong enough to hold to the extent mandated by the performance requirements, or it is not being cured properly. It, therefore, is causing inconsistencies in a coating or ink.
If the failure is adhesive then the root cause of the problem lies somewhere upstream.
Adhesive failure indicates an inability for the two things being bonded together to properly adhere at the top few molecular layers of the material. This kind of failure can be identified by observing how the adhesive remains on only one side of the material. The adhesion was never able to occur on a chemical level, which is where adhesion happens.
Rethink your adhesion manufacturing processes with Surface Intelligence.
When bonds are experiencing adhesive failure, you must work backward through the production process to explore what has not been controlled and optimized to meet the performance standards.
Knowing where to look is the first step to solving adhesion problems. Recognizing the gaps listed above and controlling material surfaces where these gaps occur will allow you to know precisely where the root cause of your problems is. When you can identify the root cause, you can focus the solution on where the problem originated.
Download the eBook, "What is Adhesion?" to learn how you can optimize your manufacturing processes to gain efficiency, eliminate failure, and build better products.


